Foldable Bike Repair Stand Setup for MTB & Road Service
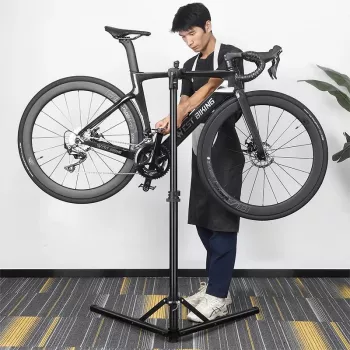
Foldable Bicycle Repair Stand: A Professional Workstation Setup for MTB and Road Bikes
A stable repair stand turns routine cleaning, drivetrain tuning, and component swaps into faster, more accurate work—especially when switching between MTB and road setups. A foldable “pro-style” workstation adds another advantage: it packs away cleanly, yet opens into a solid service position that feels closer to a shop stand than a balancing act against a wall. For more guidance, see Wall mounted work stand – any good?.
Below is a practical look at what changes when you work with a proper clamp-and-stand system, which features matter most, and how to set up the stand for safe, repeatable adjustments—whether you’re servicing a lightweight aero road bike or a heavier trail MTB. For further reading, see Bike Safety Repair Stands – Stanford Transportation.
What a Foldable Professional Workstation Changes
- Comfortable working height: Elevates the bike to reduce back strain during longer jobs like cable routing, drivetrain setup, or deep cleaning.
- Stability for precision: Keeps the bike steady for indexing gears, setting limit screws, and aligning brake calipers and rotors.
- Better access for cleaning: Lets you rotate cranks freely and reach the chain, cassette, derailleur pulleys, and chainrings without fighting gravity.
- Space-friendly storage: Folding legs and compact storage are ideal for apartments, small garages, or loading into a vehicle for race-day support.
- Works across bike styles: MTBs and road bikes differ in tire volume, cockpit width, and frame shapes—so a reliable clamp is often the difference between “supported” and “constantly shifting.”
Key Features to Look For in a Repair Stand
- Clamp design: A secure, easy-to-adjust clamp with protective jaws helps avoid damage to paint and delicate surfaces; quick-release action makes mounting faster.
- Height adjustment: A broad height range improves ergonomics for drivetrain work, cockpit tweaks, and wheel-level tasks.
- Rotation capability: Rotating the bike in the clamp (often up to 360°) improves access to bolts and cable routing without repeated remounting.
- Base stability: A wider stance and non-slip feet reduce tipping risk when applying torque or working with heavier MTBs.
- Portability: Foldable legs and a compact form factor matter for storage and travel; total weight matters if you carry it often.
- Accessory support: Tool trays and parts bins keep small hardware from disappearing mid-job.
- Bike compatibility: Confirm clamping range and weight capacity for modern MTBs (including droppers) and road bikes with aero tubing.
Feature Checklist for a Home-to-Race-Day Workstation
| Feature | Why it matters | What to verify before buying |
|---|---|---|
| Clamp jaws | Prevents frame damage and improves grip | Replaceable/protective pads; clamping range for tube sizes |
| Height adjust | Comfort and better leverage | Max/min height; stable locking mechanism |
| Rotation | Access to both sides without remounting | Smooth rotation and strong lock to prevent slipping |
| Base footprint | Safety and stability under load | Wide stance; non-slip feet; wobble resistance |
| Foldability | Easy storage and transport | Folded dimensions; quick leg locks |
| Tool tray | Keeps small parts organized | Tray size; compartments; rigidity |
Setting Up the Stand for Stability (MTB and Road)
- Start on solid ground: Place the stand on a flat, non-slip surface. Avoid soft dirt or grass unless you use a mat or base plate to prevent sinking.
- Lock the base first: Fully extend and lock the legs before mounting. Confirm all quick-release levers and knobs are snug and seated.
- Balance comfort with physics: Set clamp height so the bike’s center of mass stays over the base footprint. Higher is nicer for your back, but it can reduce stability—especially with a long-travel MTB.
- Heavier MTB approach: Keep the bike slightly lower and centered. Rotate the bike so the drivetrain is reachable without pushing the bike beyond the leg span.
- Clamp smart: Mount by a robust tube when possible. Avoid clamping thin aero profiles or carbon seatposts unless the clamp style and pressure limits are appropriate.
- Dropper post caution: Only clamp a dropper if the post manufacturer allows it and you can keep clamping pressure low; otherwise, consider clamping a sturdier frame area with care.
- High-torque awareness: For stubborn fasteners (cassette lockrings, bottom brackets), stabilize the bike with one hand and keep tools aligned to avoid sudden stand shifts.
Common Jobs That Become Easier on a Workstation
Care, Storage, and Long-Term Use
Recommended In-Stock Picks
- Foldable Bicycle Repair Stand – Professional Bike Workstation for MTB & Road: A dedicated workstation for routine service and upgrades across mountain and road bikes, with a foldable form that stores neatly between sessions.
- Muscle Relaxation Toolkit for Total Tension Relief – 3-in-1 Bundle for Deep Muscle Relaxation: A recovery-oriented add-on for post-ride soreness after long garage sessions or race weekends.
- Luxury High-Back Recliner Sofa Set: A comfort upgrade for a dedicated training or workshop lounge area when you want a real “bike cave” setup.
Helpful Service References (External)
FAQ
Is it safe to clamp a carbon frame or carbon seatpost in a repair stand?
Carbon can be clamped when the stand uses wide, protective jaws and you apply only the minimum pressure needed to prevent slipping. Clamp a sturdier area whenever possible and follow the bike or component manufacturer’s guidance; if unsure, many riders avoid clamping carbon seatposts and choose a safer clamping point.
How do the bike’s weight and stand stability affect maintenance tasks?
Heavier MTBs and high-torque jobs increase the chance of tipping or twisting in the clamp. Lowering the working height, centering the bike over the legs, double-checking all locks, and stabilizing the bike during stubborn fasteners makes the work safer and more controlled.
What working height makes repairs easier?
A common sweet spot is placing the drivetrain around waist-to-chest height so you can see adjustments clearly without hunching. If the bike feels top-heavy at that height, lower it slightly until the stand feels stable while you apply force.













Leave a comment